Pi-hole as All-Around DNS Solution with Unbound DNS
Contents
- 1 The problem: Whom can you trust?
- 1.1 What is a recursive DNS server?
- 1.2 What does this guide provide?
- 1.3 Setting up Pi-hole as a recursive DNS server solution
- 1.4 Configure unbound
- 1.5 Configure Pi-hole
- 1.6 Disable resolvconf for unbound (optional)
- 1.7 Add logging to unbound
- 1.8 Live Terminal Commands History Given below you can you use above instructions in this sequence:
- 1.9 Need Assistance
The problem: Whom can you trust?
Pi-hole includes a caching and forwarding DNS server, now known as FTLDNS. After applying the blocking lists, it forwards requests made by the clients to configured upstream DNS server(s). However, as has been mentioned by several users in the past, this leads to some privacy concerns as it ultimately raises the question: Whom can you trust? Recently, more and more small (and not so small) DNS upstream providers have appeared on the market, advertising free and private DNS service, but how can you know that they keep their promises? Right, you can’t.
Furthermore, from the point of an attacker, the DNS servers of larger providers are very worthwhile targets, as they only need to poison one DNS server, but millions of users might be affected. Instead of your bank’s actual IP address, you could be sent to a phishing site hosted on some island. This scenario has already happened and it isn’t unlikely to happen again…
When you operate your own (tiny) recursive DNS server, then the likeliness of getting affected by such an attack is greatly reduced.
What is a recursive DNS server?
The first distinction we have to be aware of is whether a DNS server is authoritative or not. If I’m the authoritative server for, e.g., pi-hole.net, then I know which IP is the correct answer for a query. Recursive name servers, in contrast, resolve any query they receive by consulting the servers authoritative for this query by traversing the domain. Example: We want to resolve pi-hole.net. On behalf of the client, the recursive DNS server will traverse the path of the domain across the Internet to deliver the answer to the question.
What does this guide provide?
In only a few simple steps, we will describe how to set up your own recursive DNS server. It will run on the same device you’re already using for your Pi-hole. There are no additional hardware requirements.
This guide assumes a fairly recent Debian/Ubuntu-based system and will use the maintainer provided packages for installation to make it an incredibly simple process. It assumes only a very basic knowledge of how DNS work.
A standard Pi-hole installation will do it as follows:
- Your client asks the Pi-hole Who is pi-hole.net?
- Your Pi-hole will check its cache and reply if the answer is already known.
- Your Pi-hole will check the blocking lists and reply if the domain is blocked.
- Since neither 2. nor 3. is true in our example, the Pi-hole forwards the request to the configured external upstream DNS server(s).
- Upon receiving the answer, your Pi-hole will reply to your client and tell it the answer to its request.
- Lastly, your Pi-hole will save the answer in its cache to be able to respond faster if any of your clients queries the same domain again.
After you set up your Pi-hole as described in this guide, this procedure changes notably:
- Your client asks the Pi-hole Who is pi-hole.net?
- Your Pi-hole will check its cache and reply if the answer is already known.
- Your Pi-hole will check the blocking lists and reply if the domain is blocked.
- Since neither 2. nor 3. is true in our example, the Pi-hole delegates the request to the (local) recursive DNS resolver.
- Your recursive server will send a query to the DNS root servers: “Who is handling .net?”
- The root server answers with a referral to the TLD servers for .net.
- Your recursive server will send a query to one of the TLD DNS servers for .net: “Who is handling pi-hole.net?”
- The TLD server answers with a referral to the authoritative name servers for pi-hole.net.
- Your recursive server will send a query to the authoritative name servers: “What is the IP of pi-hole.net?”
- The authoritative server will answer with the IP address of the domain pi-hole.net.
- Your recursive server will send the reply to your Pi-hole which will, in turn, reply to your client and tell it the answer to its request.
- Lastly, your Pi-hole will save the answer in its cache to be able to respond faster if any of your clients queries the same domain again.
You can easily imagine even longer chains for subdomains as the query process continues until your recursive resolver reaches the authoritative server for the zone that contains the queried domain name. It is obvious that the methods are very different and the own recursion is more involved than “just” asking some upstream server. This has benefits and drawbacks:
- Benefit: Privacy – as you’re directly contacting the responsive servers, no server can fully log the exact paths you’re going, as e.g. the Google DNS servers will only be asked if you want to visit a Google website, but not if you visit the website of your favorite newspaper, etc.
- Drawback: Traversing the path may be slow, especially for the first time you visit a website – while the bigger DNS providers always have answers for commonly used domains in their cache, you will have to traverse the path if you visit a page for the first time. The first request to a formerly unknown TLD may take up to a second (or even more if you’re also using DNSSEC). Subsequent requests to domains under the same TLD usually complete in < 0.1s. Fortunately, both your Pi-hole as well as your recursive server will be configured for efficient caching to minimize the number of queries that will actually have to be performed.
Setting up Pi-hole as a recursive DNS server solution
We will use unbound, a secure open-source recursive DNS server primarily developed by NLnet Labs, VeriSign Inc., Nominet, and Kirei. The first thing you need to do is to install the recursive DNS resolver:
sudo apt install unboundIf you are installing unbound from a package manager, it should install the root.hints file automatically with the dependency dns-root-data. The root hints will then be automatically updated by your package manager.
Optional: Download the current root hints file (the list of primary root servers which are serving the domain “.” – the root domain). Update it roughly every six months. Note that this file changes infrequently. This is only necessary if you are not installing unbound from a package manager. If you do this optional step, you will need to uncomment the root-hints: configuration line in the suggested config file.
wget https://www.internic.net/domain/named.root -qO- | sudo tee /var/lib/unbound/root.hintsConfigure unbound
Highlights:
- Listen only for queries from the local Pi-hole installation (on port 5335)
- Listen for both UDP and TCP requests
- Verify DNSSEC signatures, discarding BOGUS domains
- Apply a few security and privacy tricks
sudo nano /etc/unbound/unbound.conf.d/pi-hole.confserver:
# If no logfile is specified, syslog is used
# logfile: "/var/log/unbound/unbound.log"
verbosity: 0
interface: 127.0.0.1
port: 5335
do-ip4: yes
do-udp: yes
do-tcp: yes
# May be set to yes if you have IPv6 connectivity
do-ip6: no
# You want to leave this to no unless you have *native* IPv6. With 6to4 and
# Terredo tunnels your web browser should favor IPv4 for the same reasons
prefer-ip6: no
# Use this only when you downloaded the list of primary root servers!
# If you use the default dns-root-data package, unbound will find it automatically
#root-hints: "/var/lib/unbound/root.hints"
# Trust glue only if it is within the server's authority
harden-glue: yes
# Require DNSSEC data for trust-anchored zones, if such data is absent, the zone becomes BOGUS
harden-dnssec-stripped: yes
# Don't use Capitalization randomization as it known to cause DNSSEC issues sometimes
# see https://discourse.pi-hole.net/t/unbound-stubby-or-dnscrypt-proxy/9378 for further details
use-caps-for-id: no
# Reduce EDNS reassembly buffer size.
# IP fragmentation is unreliable on the Internet today, and can cause
# transmission failures when large DNS messages are sent via UDP. Even
# when fragmentation does work, it may not be secure; it is theoretically
# possible to spoof parts of a fragmented DNS message, without easy
# detection at the receiving end. Recently, there was an excellent study
# >>> Defragmenting DNS - Determining the optimal maximum UDP response size for DNS <<<
# by Axel Koolhaas, and Tjeerd Slokker (https://indico.dns-oarc.net/event/36/contributions/776/)
# in collaboration with NLnet Labs explored DNS using real world data from the
# the RIPE Atlas probes and the researchers suggested different values for
# IPv4 and IPv6 and in different scenarios. They advise that servers should
# be configured to limit DNS messages sent over UDP to a size that will not
# trigger fragmentation on typical network links. DNS servers can switch
# from UDP to TCP when a DNS response is too big to fit in this limited
# buffer size. This value has also been suggested in DNS Flag Day 2020.
edns-buffer-size: 1232
# Perform prefetching of close to expired message cache entries
# This only applies to domains that have been frequently queried
prefetch: yes
# One thread should be sufficient, can be increased on beefy machines. In reality for most users running on small networks or on a single machine, it should be unnecessary to seek performance enhancement by increasing num-threads above 1.
num-threads: 1
# Ensure kernel buffer is large enough to not lose messages in traffic spikes
so-rcvbuf: 1m
# Ensure privacy of local IP ranges
private-address: 192.168.0.0/16
private-address: 169.254.0.0/16
private-address: 172.16.0.0/12
private-address: 10.0.0.0/8
private-address: fd00::/8
private-address: fe80::/10
Start your local recursive server and test that it’s operational:
sudo service unbound restart
dig pi-hole.net @127.0.0.1 -p 5335
The first query may be quite slow, but subsequent queries, also to other domains under the same TLD, should be fairly quick.
You should also consider adding to a config file like 99-edns.conf to signal FTL to adhere to this limit.
sudo nano /etc/dnsmasq.d/99-edns.conf edns-packet-max=1232
Test validation
You can test DNSSEC validation using
dig sigfail.verteiltesysteme.net @127.0.0.1 -p 5335
dig sigok.verteiltesysteme.net @127.0.0.1 -p 5335
The first command should give a status report of SERVFAIL and no IP address. The second should give NOERROR plus an IP address.
Configure Pi-hole
Finally, configure Pi-hole to use your recursive DNS server by specifying 127.0.0.1#5335 as the Custom DNS (IPv4):
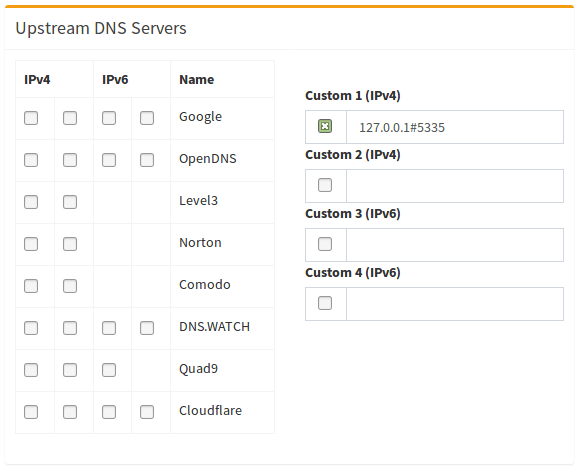
(don’t forget to hit Return or click on Save)
Disable resolvconf for unbound (optional)
The unbound package can come with a systemd service called unbound-resolvconf.service and default enabled. It instructs resolvconf to write unbound’s own DNS service at nameserver 127.0.0.1 , but without the 5335 port, into the file /etc/resolv.conf. That /etc/resolv.conf file is used by local services/processes to determine DNS servers configured. If you configured /etc/dhcpcd.conf with a static domain_name_servers= line, these DNS server(s) will be ignored/overruled by this service.
To check if this service is enabled for your distribution, run below one and take note of the Active line. It will show either active or inactive or it might not even be installed resulting in a could not be found message:
sudo systemctl status unbound-resolvconf.serviceTo disable the service if so desire, run below two:
sudo systemctl disable unbound-resolvconf.servicesudo systemctl stop unbound-resolvconf.serviceTo have the domain_name_servers= in the file /etc/dhcpcd.conf activated/propagate, run below one:
sudo systemctl restart dhcpcdAnd check with below one if IP(s) on the nameserver line(s) reflects the ones in the /etc/dhcpcd.conf file:
cat /etc/resolv.confAdd logging to unbound
It’s not recommended to increase verbosity for daily use, as unbound logs a lot. But it might be helpful for debugging purposes.
There are five levels of verbosity
Level 0 means no verbosity, only errors
Level 1 gives operational information
Level 2 gives detailed operational information
Level 3 gives query level information
Level 4 gives algorithm level information
Level 5 logs client identification for cache misses
First, specify the log file and the verbosity level in the server part of
sudo nano /etc/unbound/unbound.conf.d/pi-hole.confserver:
# If no logfile is specified, syslog is used
logfile: "/var/log/unbound/unbound.log"
verbosity: 1
Second, create log dir and file, set permissions:
sudo mkdir -p /var/log/unbound
sudo touch /var/log/unbound/unbound.log
sudo chown unbound /var/log/unbound/unbound.log
Third, restart unbound:
sudo service unbound restart
To remove unbound from your system run
sudo apt remove unboundMake sure to switch to another upstream DNS server for Pi-hole.
Live Terminal Commands History Given below you can you use above instructions in this sequence:
 187  sudo apt install unbound
 188  wget https://www.internic.net/domain/named.root -qO- | sudo tee /var/lib/unbound/root.hints
 189  nano /etc/unbound/unbound.conf.d/pi-hole.conf
 190  service unbound restart
 191  dig pi-hole.net @127.0.0.1 -p 5335
 192  systemctl status unbound
 193  nano /etc/dnsmasq.d/99-edns.conf
 194  dig sigfail.verteiltesysteme.net @127.0.0.1 -p 5335
 195  systemctl status unbound-resolvconf.service
 196  service unbound restart
 197  systemctl restart unbound-resolvconf.service
 198  systemctl status unbound-resolvconf.service
 199  sudo service unbound restart
 200  systemctl status unbound-resolvconf.service
 201  clear
 202  systemctl status unbound-resolvconf.service
 203  dig pi-hole.net @127.0.0.1 -p 5335
 204  systemctl status unbound-resolvconf.service
 205  systemctl status unbound
 206  sudo systemctl disable unbound-resolvconf.service
 207  sudo systemctl disable unbound-resolvconf.service
 208  sudo systemctl stop unbound-resolvconf.service
 209  systemctl status unbound-resolvconf.service
 210  sudo systemctl restart dhcpcd
 211  sudo mkdir -p /var/log/unbound
 212  sudo touch /var/log/unbound/unbound.log
 213  sudo chown unbound /var/log/unbound/unbound.log
 214  sudo service unbound restart
 215  systemctl status unbound
 216  cat /etc/resolv.conf
 217  nano /etc/dhcpcd.conf
 218  systemctl reboot
 219  apt update
 220  apt upgrade
 221  apt full-upgrade
 222  apt autoremove
Need Assistance
If you need professional assistance configuring your deployment, you can use our commercial support to help get you up and running.
Key Terms:
- dns security ,
- Open Source Software ,
- pihole ,
- pihole dns ,
- unbound dns