How to install Kubernetes in Ubuntu 20.04 LTS Server
Ubuntu 20.04 Download
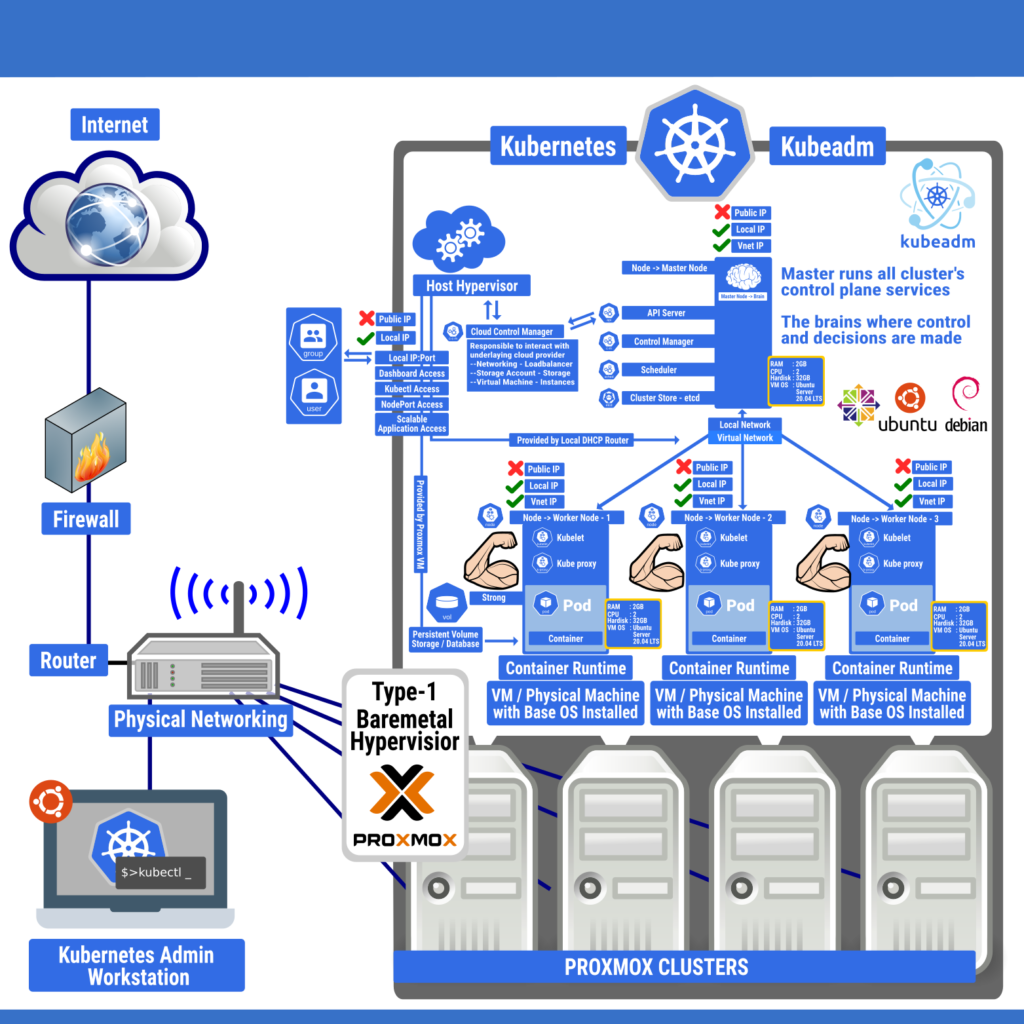
What You’ll Need At least four VM on Proxmox
———— Command for ALL VM’s ——————–
Set-up Process
IP Address to Static IP
sudo nano /etc/netplan/filename.yaml
sudo netplan apply
Edit the host name
Edit /etc/hosts and /etc/hostname

For example:

 k8s-master - 192.168.x.1x8
 k8s-worker1 - 192.168.x.1x9
 k8s-worker2 - 192.168.x.2x0
 k8s-worker3 - 192.168.x.2x1
———————Step – 1 ——————–
Install all updates
    sudo apt update && sudo apt dist-upgrade
    Reboot
Reboot each VM:
   sudo reboot

Create a user for yourself
 sudo adduser brajesh
 usermod -aG sudo brajesh
———————Step – 2 ——————–
Install Docker
    curl -sSL get.docker.com | sh
    sudo usermod -aG docker brajesh

Set Docker daemon options Edit the daemon.json file (this file most likely won't exist yet)

 sudo nano /etc/docker/daemon.json
 {
   "exec-opts": ["native.cgroupdriver=systemd"],
   "log-driver": "json-file",
   "log-opts": {
     "max-size": "100m"
   },
   "storage-driver": "overlay2"
 }
———————Step – 3 ——————–
Enable routing. Find the following line in the file: sudo nano /etc/sysctl.conf
 #net.ipv4.ip_forward=1
Uncomment that line.

Disable Swap in all VM. Find the following line in the file: sudo nano /etc/fstab
  #/swap.img  none  swap  sw  0   0
Comment that line.

Reboot again
   sudo reboot
———————Step – 4 ——————–
Test that docker is working properly
Check docker daemon:

     systemctl status docker

Run the hello-world container:
   docker run hello-world

Add Kubernetes repository
    sudo nano /etc/apt/sources.list.d/kubernetes.list

Add:
   deb http://apt.kubernetes.io/ kubernetes-xenial main
———————Step – 5 ——————–
Add the GPG key to the VM:

   curl -s https://packages.cloud.google.com/apt/doc/apt-key.gpg | sudo apt-key add -
———————Step – 6 ——————–
Install required Kubernetes packages
      sudo apt update
      sudo apt install kubeadm kubectl kubelet
Note: If you get errors with the first command, wait a few minutes and try again.
———————Step – 7 ——————–
————————-Master-only Commands—————————–
Initialize Kubernetes
Run:
    sudo kubeadm init --pod-network-cidr=10.244.0.0/16

Once this runs, you will get some output that will include the join command, but don't join nodes yet. Copy this somewhere for later.

Set up config directory
The previous command will give you three additional commands to run, most likely these:

    mkdir -p ~.kube
    sudo cp /etc/kubernetes/admin.conf ~/.kube/config
    sudo chown $(id -u):$(id -g) $HOME/.kube/config

Go ahead and run those, but if it recommends different commands, run those instead.
———————Step – 8 ——————–
Install flannel network driver

   kubectl apply -f https://raw.githubusercontent.com/coreos/flannel/master/Documentation/kube-flannel.yml

Note: The lack of sudo is intentional
———————Step – 9 ——————–
Make sure all the pods come up
kubectl get pods --all-namespaces
Join worker nodes to the cluster
Once all of the pods have come up, run the join command on each worker node. This command was provided in an earlier step.

Check status of nodes
See if the nodes have joined successfully, run the following command a few times until everything is ready:

 kubectl get nodes
———————Step – 10 ——————–
Dashboard Access

kubectl apply -f https://raw.githubusercontent.com/kubernetes/dashboard/v2.2.0/aio/deploy/recommended.yaml

namespace/kubernetes-dashboard created
serviceaccount/kubernetes-dashboard created
service/kubernetes-dashboard created
secret/kubernetes-dashboard-certs created
secret/kubernetes-dashboard-csrf created
secret/kubernetes-dashboard-key-holder created
configmap/kubernetes-dashboard-settings created
role.rbac.authorization.k8s.io/kubernetes-dashboard created
clusterrole.rbac.authorization.k8s.io/kubernetes-dashboard created
rolebinding.rbac.authorization.k8s.io/kubernetes-dashboard created
clusterrolebinding.rbac.authorization.k8s.io/kubernetes-dashboard created
deployment.apps/kubernetes-dashboard created
service/dashboard-metrics-scraper created
Warning: spec.template.metadata.annotations[seccomp.security.alpha.kubernetes.io/pod]: deprecated since v1.19; use the "seccompProfile" field instead
deployment.apps/dashboard-metrics-scraper created


Admin User Creation for Dashboard Access

kubectl apply -f dashboard-adminuser.yaml
dashboard-adminuser.yaml
---
  apiVersion: v1
  kind: ServiceAccount
  metadata:
   name: admin-user
   namespace: kubernetes-dashboard
---
  apiVersion: rbac.authorization.k8s.io/v1
  kind: ClusterRoleBinding
  metadata:
    name: admin-user
  roleRef:
    apiGroup: rbac.authorization.k8s.io
    kind: ClusterRole
    name: cluster-admin
  subjects:
  - kind: ServiceAccount
    name: admin-user
    namespace: kubernetes-dashboard
———————Step – 11 ——————–
kubectl get ns

kubectl -n kubernetes-dashboard get all
kubectl -n kubernetes-dashboard describe service kubernetes-dashboard
kubectl -n kubernetes-dashboard port-forward kubernetes-dashboard-78c79f97b4-hzr7v 8000:8443 [failed]

kubectl -n kubernetes-dashboard edit svc kubernetes-dashboard  [passed]

Add:-  nodePort 32323  -- addnodeport below targetPort ----
Change:-  type: NodePort --- change ClusterIP to NodePort -----

kubectl -n kubernetes-dashboard get sa
kubectl -n kubernetes-dashboard describe sa admin-user
kubectl -n kubernetes-dashboard describe secret admin-user-token-6c8s2  ---- copy token from this command ----
—————-Workstation Instruction and Commands————————
———————Step – 12 ——————–
Open in Browser : https://KubeMasterIP:32323/#/login
Paste above copied secret token and login to dashboard
———————Step – 13 ——————–
kubectl commands for Workstation Without login in to the Kubernetes Master Server. For Running Local command effective to Kubernetes Master server
scp user@KubeMasterIP:~/.kube/config ~/.kube/configNeed Assistance
If you need professional assistance configuring your deployment, you can use our commercial support to help get you up and running.
Key Terms:
- Kubernetes ,
- Kubernetes Installation ,
- Open Source Software